Start mirroring
- Supported: Android 5+, including HarmonyOS 1.0–4.0
- Deep integration with EC — smoother script execution and monitoring
- Based on EC control center screen mirroring V3.2.0+; other versions are similar
Download & install
- Download from Tutorials & resources — one-click installer or manual download
- Cloud path:
[Dev package → Android resources → Control center screen mirroring → EasyClick Android control center screen mirroring.zip]— extract and run the.exe - Use a path without special characters or spaces — preferably all English
Register & sign in
- After opening the control center or mirroring app, register or sign in; if you registered at https://uc.ieasyclick.com, sign in directly
- iOS EC users can sign in too; due to legacy design, iOS, network license, and Android control center accounts are shared — Android packaging accounts are separate
- Accounts registered here can later sign in to the iOS control center and network license backend
- Register button: top-right of the control center or mirroring app
- Many mirroring modes are supported — read the sections below carefully
USB mirroring
- Wired mirroring is stable; USB data transfer is fast
Prerequisite: connect the phone to the PC with a data cable and enable ADB debugging on the phone- Enable USB debugging; Huawei tutorial: https://www.bilibili.com/video/BV11x4y117Sb
- Other phones: search online for “enable USB debugging”
- After enabling, connect the cable — the system auto-detects and lists the device
- If the device is missing, check drivers or ADB conflicts — open the left toolbar Device list to see ADB-connected devices

- If Status in the ADB device list is not Normal, connection fails — for unauthorized, approve on the phone; for offline, reconnect the cable
- For ADB conflicts, see FAQ
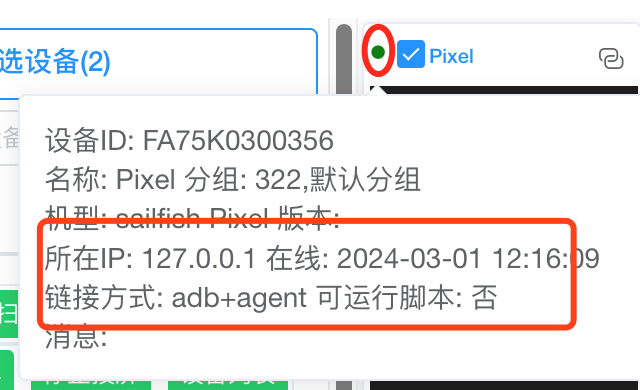
- After connection, the green dot on the device shows details; click left toolbar → Start mirroring, or right-click the mirroring view → Start mirroring to open the mirroring page
ADB Wi‑Fi mode
- ADB Wi‑Fi requires USB debugging and network debugging enabled; connect via ADB first, then open device list and enable ADB Wi‑Fi
- Click the left toolbar scan button, choose ADB Wi‑Fi scan (subnet is prefilled; add others if needed); after scan, devices connect to the control center automatically
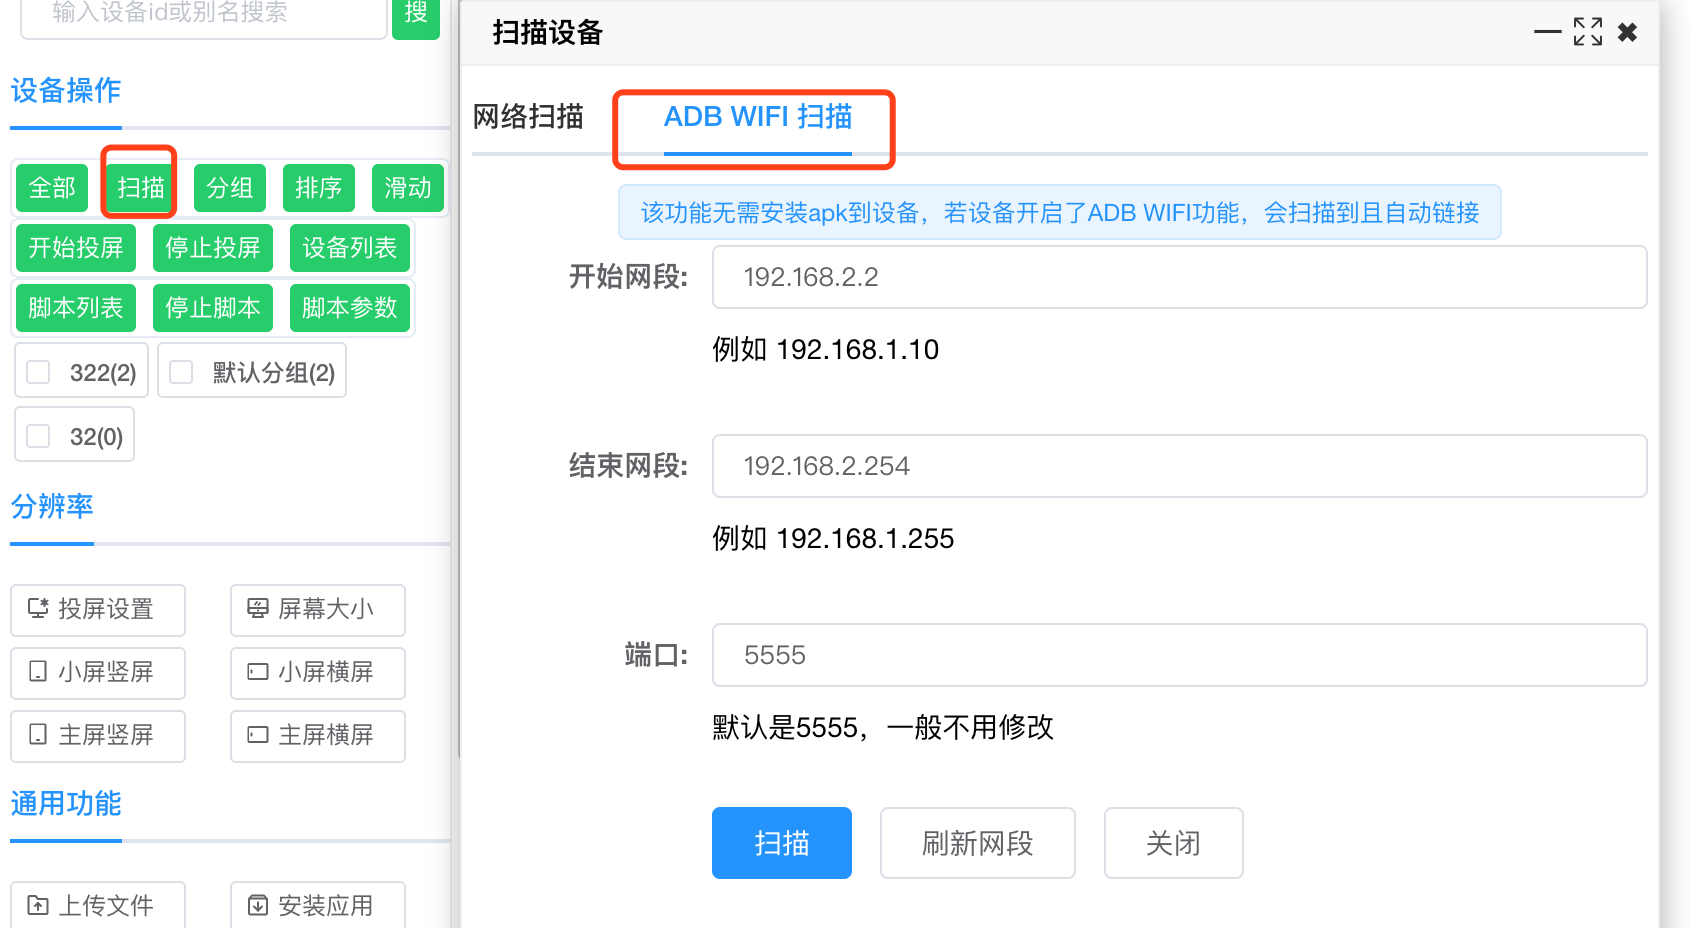
- After ADB Wi‑Fi connects, operation is the same as USB ADB mode
LAN Wi‑Fi mirroring
- LAN Wi‑Fi mirroring uses the EC APK — no cable; taps run via accessibility service or agent mode from system settings
- Install APK: click Scan → scan QR on phone to install, or download and install manually

- Left toolbar → Scan → Network scan → Broadcast scan (phone and PC must be on the same LAN)

-
APK receives scan info, saves control center address, and connects automatically
-
If scan fails, set the correct network adapter under left toolbar → Set network adapter, then scan again
-
If that still fails, enter the control center address manually, or enter the phone’s subnet and use subnet scan
-
Manual connection
-
Open APK → top-left menu → system settings
-
Control center mirroring settings → enter control center PC IP, or
PC IP:8178 -
Enable log float window → Test connection
-
If device serial is empty, enable ADB debugging and connect USB once to the control center — serial can be arbitrary as long as it is unique (For HID mode, do not use random values — get serial via ADB or enter the correct HID serial)

- Note: if your PC has a public IP, control center and mirroring can work over the public internet
- Open the float window; in EC app system settings, enable Start/stop float display or Log float display to keep the process alive
- Set EC as the default IME — see Text input in this chapter; optional but helps avoid popups on some phones
- Then start mirroring; if screen capture permission does not appear, set EC as default IME, open the float window, or open the EC app
- Before Wi‑Fi mirroring, enable accessibility automation: toolbar → Enable automation — see Grant accessibility auto-start to grant auto-start accessibility without manual taps
- Optionally grant screenshot auto-allow first — see Grant screenshot auto-allow; mirroring will not prompt for capture permission
WAN mirroring
- WAN mirroring is for phones and the mirroring PC on different networks or remote locations
- Install the APK first — see Install APK under
LAN Wi‑Fi mirroring - Manual connection to control center — see Manual connection under
LAN Wi‑Fi mirroring - IME and tap settings are the same as
LAN Wi‑Fi mirroring - Requires mapping control center ports to the public internet; without a public IP, see Set up intranet penetration below
Set up intranet penetration
- Example: Alibaba Cloud — buy an ECS instance with
Ubuntu 22.04orUbuntu 24.04 - After install, note the server password; get the server IP from the Alibaba Cloud console
- Open ports 7000, 8988, 8178 in the cloud console Alibaba Cloud port guide; if using Baota or a firewall, allow these ports there too
- Left toolbar → Intranet penetration → server IP, port usually
22, username usuallyroot, password → Install; wait for Install succeeded

- Click Start penetration service; if it reports success, local penetration is ready
- Then continue Manual connection under WAN mirroring
- If connection fails, restart remote and local penetration services
HID mirroring (USB-HID, Bluetooth HID, OTG-HID)
- HID mirroring replaces taps with HID mode — no accessibility service or ADB debugging required
- HID mirroring can carry data from LAN Wi‑Fi or WAN mirroring
- Three HID types: USB-HID, Bluetooth HID, OTG-HID
- USB-HID: recommended on a Linux host — USB-HID host setup
- Bluetooth HID: Bluetooth HID hardware guide — configure before use
- OTG-HID: OTG-HID hardware guide
- OTG is recommended — simple setup, fast response
OTG HID taps
- See OTG-HID hardware guide
- Configure OTG as in that guide
- Mirroring view → left toolbar → System settings → Mirroring config → set mode to OTG-HID
- Then operate the screen
- If it fails, test under app settings → OTG-HID settings
Bluetooth HID taps
- See Bluetooth HID hardware guide
- Mirroring view → left toolbar → System settings → Mirroring config → set mode to Bluetooth-HID
- Then operate the screen
- If it fails, test under app settings → Bluetooth BLE settings
USB HID taps
- USB HID needs no accessibility or USB debugging; recommended:
Linux+ HID host program — HID mini host - After installing the USB HID host on Linux: Mirroring view → left toolbar → USB HID host → Advanced networking, scan for HID host, then continue
-
- Mirroring page → System settings → Mirroring config → set tap mode to USB-HID
-

-
- Toolbar → Activate USB HID; HID activated successfully on the mirroring page means HID taps work
-


-
- If it fails, open toolbar HID host — check device list, HID activation, driver install, etc.
- HID host install, upgrade, and networking: HID mini host
Text input
- Set up the IME before plugging in USB to avoid wrong IME package names
- If input still fails after setup, reboot the phone once
- USB and HID mirroring allow typing in the mirroring view; Chinese may not be supported
- Best input across all four mirroring modes: EC built-in IME
- Type in the mirroring view or in the input box below it
- Modes: system default or custom keyboard
- For custom keyboard:
- Left toolbar → System settings → Input method → choose custom keyboard and save
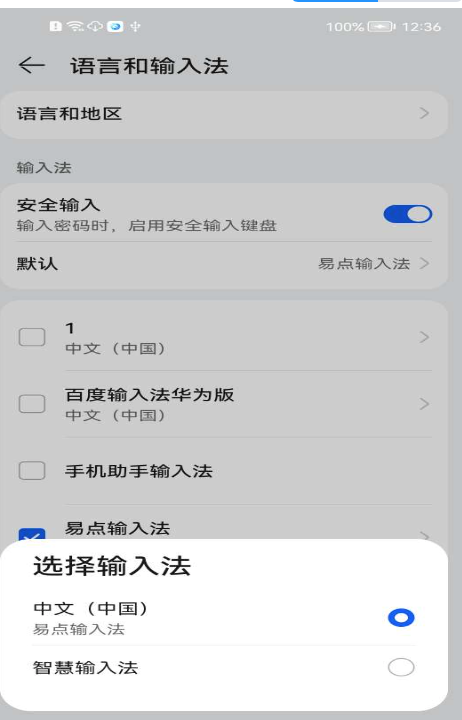
- Phone Settings → Language & input → set EC app as default IME
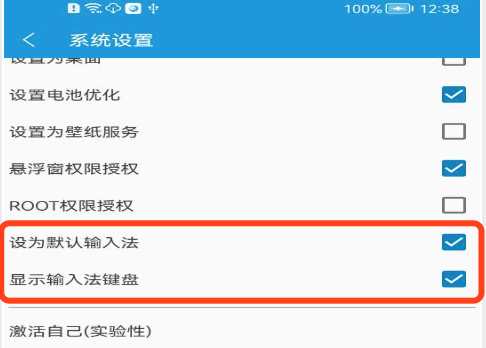
- In EC app system settings, enable Show input method keyboard

Phone IME settings example:
EC app checkbox example:
EC keyboard:
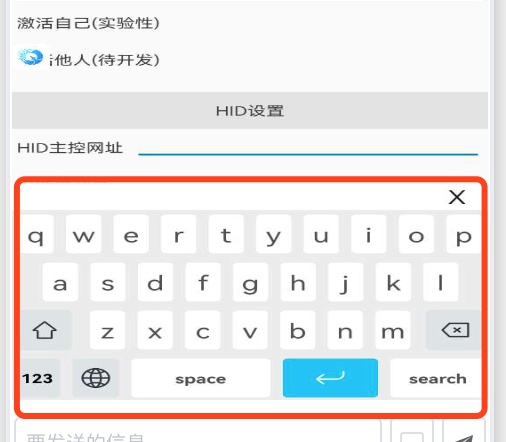
After the above, you can type directly in the mirroring view
Mirroring mode switch
- Supports Normal mode and P2P mode
- Normal mode: direct connection, higher bandwidth, stable
- P2P mode: peer-to-peer, lower bandwidth; WAN penetration may be weaker; same as Normal on LAN or USB
- Recommendation: either mode on Wi‑Fi LAN and USB; on WAN try P2P first, then Normal if mirroring fails
- Left toolbar → Mirroring settings, or right-click mirroring view → Mirroring settings

- Set resolution, frame rate, mirroring method, etc.
Grant accessibility auto-start
- Grants permission for accessibility to start automatically for scripts — not available on all devices
- Left menu → Device list → enter EC app package name (see EC app system settings) → Grant accessibility auto-start → in EC app system settings confirm Accessibility auto-start is checked
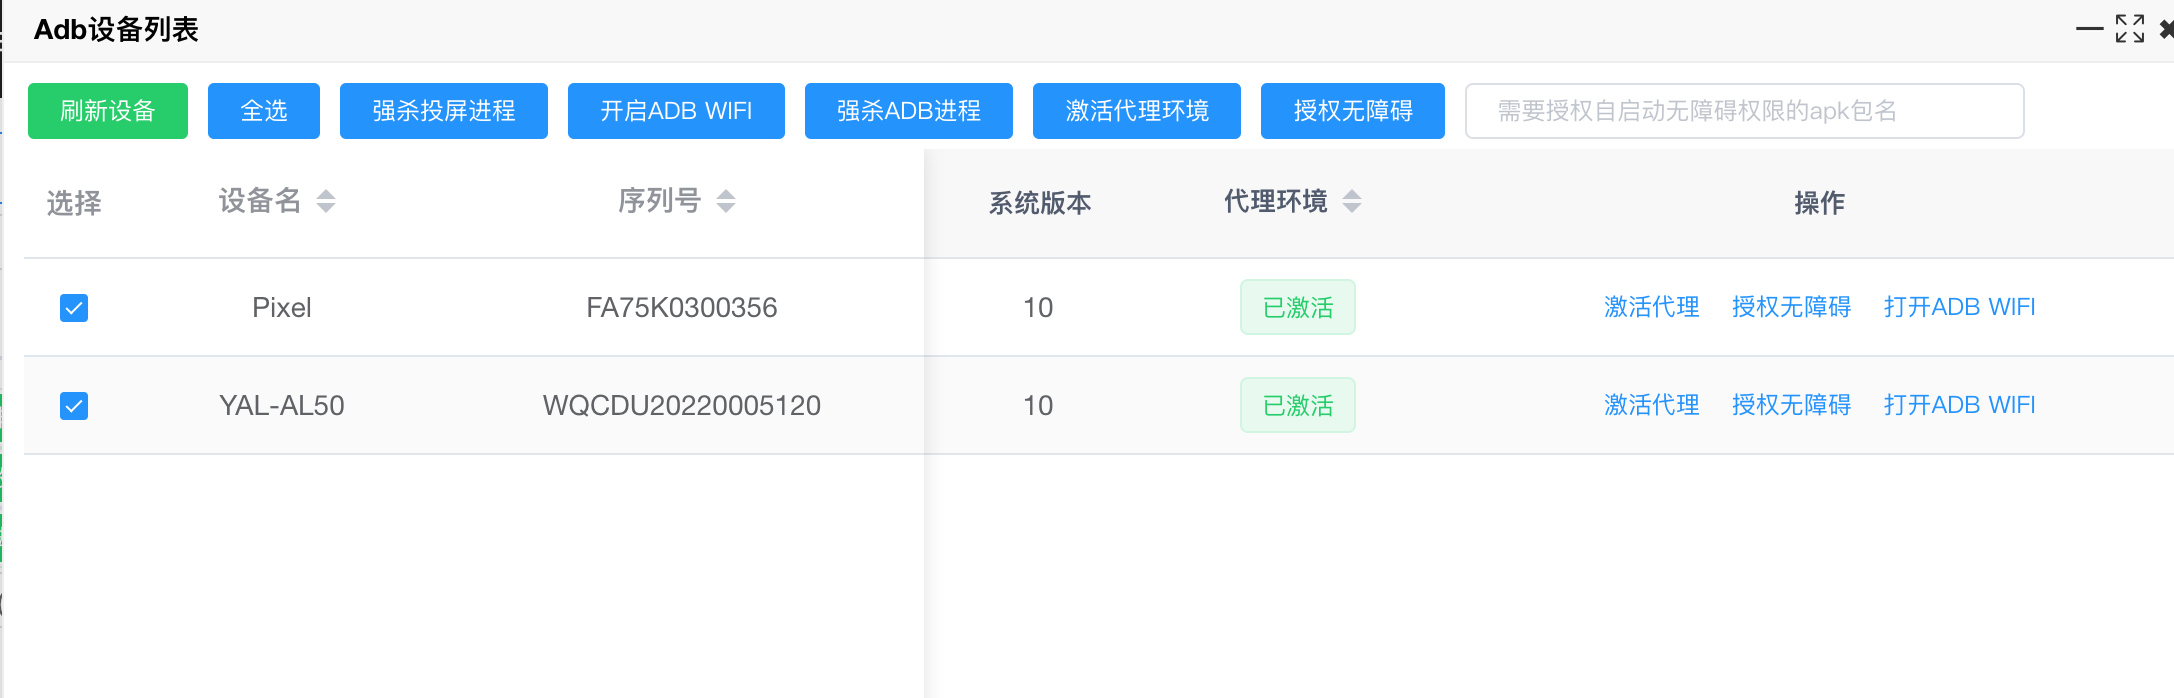
Grant screenshot auto-allow
- Grants automatic screenshot approval for scripts — not available on all phones
- Left menu → Device list → enter EC app package name → Grant screenshot auto-allow → in EC app system settings confirm Screenshot auto-allow is checked
